схема водопровода, система своими руками
Водоснабжение частного дома из колодца – достаточно сложный и трудоемкий процесс. Приходится устанавливать различные системы повышения давления, а также автономной подачи воды. Существуют несколько основных моментов:
- Выкопанный колодец, глубиной не менее 6–8 метров.
- Магистраль подачи воды в строение.
- Погружной насос повышенной мощности, станция.
- Разводка трубопровода.
- Монтаж бака (расширительного), накопительного резервуара и др. оборудования.
Требования к источнику
При составлении схемы водоснабжения, будь то водопровод на даче или монтаж системы в частном доме, нельзя забывать про СНиП. Вот несколько технических характеристик, которые нужно соблюдать:
- Шахта должна быть глубокой. Не менее четырех-пяти железобетонных колец.
- Материал, из которого собирается колодец, должен быть надежным и прочным. Лучше всего подойдет железобетонное кольцо диаметром 1,5–2,0 метра, с пазовой системой сборки. Вместо них можно использовать железобетонные трубы диаметром не менее 800 см, установленных вертикально раструбом вверх.
- Необязательное требование – внешняя герметизация колец листом ПНД. Новая передовая технология будет преградой ила и глины, которая в любом случае будет проникать вовнутрь. Тут следует помнить, что отверстия в кольце все равно придется делать, иначе источник просто высохнет.
- При монтаже источника обязательно на самое его дно насыпают 20–30 см песчано-гравийной смеси, а лучше всего отсева с камнями крупной фракции.
- После установки колодца его полностью засыпают отсевом или ПГС. Так как в шахту должна проникать вода, его нельзя делать слишком герметичным.
- Последним требованием будет абсолютный запрет на использование металла. Он со временем начнет окисляться и ржаветь и никакой фильтр здесь не поможет.
Система водоснабжения частного дома с накопительным баком (из колодца или скважины
Работает эта система так:
- Вода из колодца или скважины насосом подается в емкость, ее уровень контролируется поплавковым механизмом. При достижении порогового значения насос отключается.
- За счет того, что накопительная емкость находится выше всех точек раздачи воды, в системе создается некоторое давление. При открывании крана за счет этого давления вода поступает в точку раздачи.
- При снижении уровня воды в емкости ниже определенной отметки, включается насос, добавляя воду.
Система водоснабжения частного дома или дачи с накопительным резервуаром проста и недорога. Но есть целый ряд серьезных недостатков:
- При такой организации водоснабжения давление в системе низкое, да еще и переменное — зависит от уровня воды в емкости и количества открытых кранов. Из-за этого никакая бытовая техника работать не будет (автоматическая стиральная машина, электрический водонагреватель (бойлер), посудомойка, автономная система отопления и т.д.).
- При отказе автоматики есть реальная угроза затопить дом водой, переливающейся через край. Опасность можно уменьшить, если сделать систему аварийного слива воды. Для этого в накопительную емкость чуть выше требуемого уровня воды приваривают трубу, через которую в случае повышения уровня вытекают излишки. Трубу вывести можно в канализацию или дренажную систему, а можно — в огород. Но нужна какая-то индикация того, что воды в баке слишком много (звук льющейся воды — тоже один из сигналов).
- Емкость имеет солидные размеры, и место для нее найти не всегда легко. Как вариант — построить вышку рядом с домом, на которой расположить бак для воды.
Если на даче никакой техники не предвидеться, использовать можно и такую схему снабжения водой. Но в доме мало кого такой вариант устроит. Нужно будет рассмотреть следующий вариант.
Схема с гидроаккумулятором и насосной станцией
Эта система водоснабжение частного дома из колодца и скважины обеспечивает стабильное давление, потому можно подключать любую технику. В ее основе тоже лежит насос, но подает воду он в гидроаккумулятор, а управляется системой автоматики. Если все эти компоненты объединены в одно устройство — оно называется насосной станцией.
Схема водоснабжения частного дома с гидроаккумулятором
Гидроаккумулятор для водопровода — железный бак, разделенный эластичной мембраной (резиновой) на две части. В одной части закачан под определенным давлением газ, во вторую поступает вода. Заполняя бак вода, растягивает мембрану, сжимая газ еще больше, из-за чего в системе и создается давление.
Принцип работы системы водоснабжения с гидроаккумулятором такой:
- Насос включается, качает воду, создавая заданное давление в системе. Оно контролируется датчиками. Их два: верхнего и нижнего порога давления. При достижении верхнего порога датчик отключает насос.
- При открывании крана или расходе воды техникой происходит постепенное снижение давления в системе. При достижении нижнего порога второй датчик дает команду на включение насоса. Вода подается снова, выравнивая его.
Такая система автономного водоснабжения дает более высокий уровень комфорта. Но для ее организации требуется больше средств: насосная станция и гидроаккумулятор достаточно дорогие устройства. Кроме того, это оборудование более требовательно к качеству воды (минимум примесей) для чего должен стоять хороший фильтр. Есть требования и к трубопроводу (гладкие внутренние стенки) и к производительности насоса: вода должна подаваться постоянно, без перебоев. При использовании в качестве источника воды колодца, он должен иметь хороший дебет (вода должна поступать быстро), что не всегда возможно. Потому такие схемы чаще реализуются со скважинами.
Про то, как собирать скважинный насос, смотрите видео.
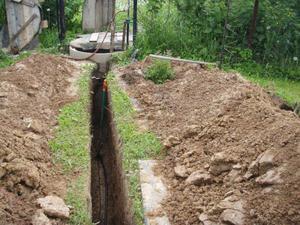
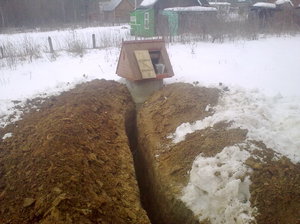
Водоснабжение частного дома из колодца и скважины: прокладка труб
Любая из описанных схем водоснабжения частного дома реализуется при помощи насоса, подающего воду к дому. При этом должен быть сооружен трубопровод, соединяющий колодец или скважину с насосной станцией или накопительным баком. Существуют два варианта укладки труб — только для летнего использования или для всесезонного (зимнего).
Участок горизонтальной трубы может находится или ниже глубины промерзания грунта или его нужно утеплять
При устройстве летнего водопровода (для дачи) трубы можно укладывать поверху или в неглубокие канавы. При этом нужно не забыть в самой нижней точке сделать кран — сливать воду перед зимой, чтобы в мороз замерзшая вода не разорвала систему. Или сделать систему разборной — из труб, которые можно скатывать на резьбовых фитингах — а это — трубы ПНД. Тогда осенью все можно разобрать, скрутить и уложить на хранения. Весной все вернуть.
Прокладка труб водоснабжения по участку для зимнего использования требует больших затрат времени, сил и денег. Даже в самые сильные морозы они не должны замерзать. И решений два:
- уложить их ниже глубины промерзания грунта;
- закопать неглубоко, но обязательно обогреть или утеплить (а можно и то, и другое).
Глубокое заложение
Глубоко закапывать водопроводные трубы имеет смысл, если он промерзает не более чем на 1,8 м. Копать придется еще на 20 см глубже, а потом на дно насыпать песок, в который укладывать трубы в защитной оболочке: они будут подвергаться солидной нагрузке, ведь сверху почти двухметровый слой грунта. Раньше в качестве защитной оболочки использовали асбестовые трубы. Сегодня есть еще пластиковый гофорорукав. Он дешевле и легче, проще укладывать в него трубы и придавать нужную форму.
При укладке трубопровода ниже глубины промерзания приходится копать глубокую траншею длинной на всю трассу

Хоть подобный метод требует больших затрат труда, его используют, потому что он надежен. Во всяком случае, участок водопровода между колодцем или скважиной и домом стараются уложить именно ниже глубины промерзания. Трубу выводят через стенку колодца ниже глубины промерзания грунта и в траншее ведут под дом, там поднимают выше. Самое проблемное место — выход из земли в дом, можно дополнительно подогревать электрическим греющим кабелем. Он работает в автоматическом режиме поддерживая заданную температуру нагрева — работает только в том случае, если температура ниже заданной.
При использовании в качестве источника воды скважины и насосной станции, устанавливают кессон. Его закапывают ниже глубины промерзания грунта, в нем же ставят оборудование — насосную станцию. Обсадную трубу обрезают так, чтобы она была выше дна кессона, и трубопровод выводят через стенку кессона, тоже ниже глубины промерзания.
Прокладка труб водоснабжения в частном доме из скважины при устройстве кессона

Закопанный в земле водопровод сложно ремонтировать: придется окапывать. Потому постарайтесь заложить цельную трубу без стыков и сварных швов: именно они дают больше всего проблем.
Близко к поверхности
При неглубоком заложении земляных работ меньше, но в этом случае имеет смысл сделать полноценную трассу: траншею выложить кирпичом, тонкими бетонными плитами и т.п. На этапе строительства затраты значительные, но эксплуатация удобная, ремонт и модернизация — без проблем.
В этом случае трубы водоснабжения частного дома из колодца и скважины поднимаются до уровня траншеи и там выводятся. Укладываются они в теплоизоляции, предотвращающей их замерзание. Для страховки их можно еще и греть — использовать греющие кабели.
Один практический совет: если от погружного или скважинного насоса к дому идет кабель электропитания, его можно упрятать в защитную оболочку из ПВХ или др. материала, а потом прикрепить к трубе. Крепят через каждый метр куском скотча. Так вы будете уверены, что электрическая часть у вас в безопасности, кабель не перетрется и не порвется: при подвижках грунта нагрузка будет на трубе, а не на кабеле.
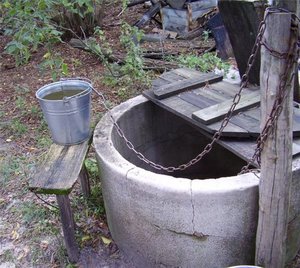
Герметизация входа в колодец
При организации водоснабжение частного дома из колодца своими руками, обратите внимание на заделку места выхода водопроводной трубы из шахты. Именно отсюда чаще всего грязная верховодка попадает внутрь.
Важно выход водопроводной трубы их шахты колодца хорошо загерметизировать

Если отверстие в стенке шахты ненамного больше диаметра трубы, щель можно заделать герметиком. Если зазор большой, его замазывают раствором, а после высыхания промазывают гидроизолирующим составом (битумной пропиткой, например или составом на основе цемента). Промазать желательно и снаружи и изнутри.
Из чего состоит
Источник воды и ввод его в дом — далеко не вся система водоснабжения. Нужны еще фильтры. Первая, грубая фильтрация происходит еще в точке всасывания. В таком виде ее можно использовать для технических целей, например, завести в туалет. Но даже для полива неочищенную воду можно подавать далеко не в каждом случае, а в душ или на кухню — тем более. Потому водоснабжение частного дома из колодца и скважины включает в себя еще и систему фильтров.
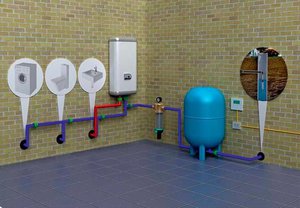
План водоснабжения частного дома из колодца

Обратите внимание: на рисунке есть три ступени фильтрации:
- на всасывающей трубе — сетчатый фильтр;
- перед входом в насос — фильтр грубой очистки;
- перед подачей в дом — фильтр тонкой очистки.
На каждой из ступеней фильтр (или фильтры) подбирается в зависимости от воды. Ее качество определяется в лаборатории. На основании химического состава и подбирается оборудование для очистки.
Автономное водоснабжение
Всем хороши системы с насосными станциями, кроме того момента, что для их работы требуется электричество. Запас воды есть, но он равен объему гидроаккумулятора, а он не больше 100 литров. Такого количества надолго не хватит. Если вам нужен резервный запас хотя-бы на день или больше, лучше всего закачивать воду сначала в накопительный бак, а из него подавать на вход насосной станции. Такая же система хорошо работает и в случае, если ваш дом подключен к централизованному водопроводу, но в нем давление очень низкое или вода подается по часам.
Как собрать автономное водоснабжение частного дома своими руками

В представленной на фото схеме нет только аварийного перелива. Это трубопровод, выходящий из накопительного бака чуть выше максимального уровня воды. Он выводится в канализацию. По нему стекают излишки воды в случае неполадок с поплавковым механизмом. Если его не установить, можно залить дом.
Если вам необходимо резервное водоснабжение частного дома на случай отключения электроэнергии, накопитель нужно устанавливать наверху, выше всех точек водоразбора. Тогда при отключении электрики вода будет в трубы подаваться самотеком. Душ вы принять не сможете, но в кранах она будет. Это будет бесперебойное водоснабжение частного дома в любых условиях.
 Для тех кто постоянно проживает за городом, колодец является основным источником питьевой воды. Однако не всякий раз хочется таскать тяжелые ведра от колодца до дома. А если на улице снег или дождь, то выходить из дома не хочется вовсе. Зачем терпеть неудобство, когда воду от колодца в дом можно провести самостоятельно. Правда, для этого нужно решить несколько строительных задач.
Итак, имеется участок с выкопанным колодцем и хочется, чтобы вода без перебоев в любое время суток поступала прямо в дом. Для осуществления задуманного нужно произвести работы по гидроизоляции и утеплению колодца, монтажу системы труб, установке системы фильтрации и доочистки, а также по установке насосного оборудования.
Работы по гидроизоляции колодца
Колодцу требуется обязательная гидроизоляция, как ни парадоксально это не звучало. На это существует ряд причин.
 Вода в колодце всегда должна быть чистой. Грязные грунтовые воды не должны попадать через стенки колодца внутрь. Грунтовые воды расположены ближе к земной поверхности, нежели водная линза, из которой в колодец поступает вода. В почве достаточно всякого рода разлагающихся организмом, встречаются фекальные массы, болезнетворные бактерии, химикалии для сельскохозяйственных нужд и т.п. Если допустить попадание таких жидкостей в колодец, то его заражение неминуемо. Использовать такой колодец для забора питьевой воды запрещается.
- Гидроизоляция необходима для сохранения структуры и прочности самих железобетонных стен колодца. Бетон хоть и кажется прочным, но под действием солевых и кислотных растворов, поступающих из почвы, разрушается. Материал становится рыхлым и, теряя прочность, начинает крошиться, что, в свою очередь, дает возможность грунтовым водам проникнуть в колодец и загрязнить питьевую воду.
Гидроизоляционные работы направлены на то, чтобы создать защиту бетонных колодезных колец и загерметизировать стыки между ними.
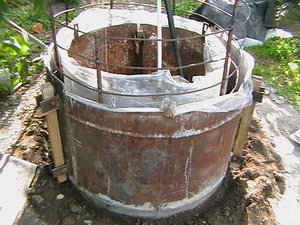 Разумно провести гидроизоляцию еще на этапе строительства колодца, то есть еще до опускания колец в шахту. Это дает возможность провести гидроизоляцию поверхности железобетонных частей как внутреннюю, так и наружную. Это существенно поднимет износостойкость деталей и предотвратит протекание грунтовых вод через стенки колодца.
- Наружная гидроизоляция проводится обмазочным методом, после нее проклеивают в несколько слоев рубероид. Однако, кольца, имея такое покрытие, очень сложно монтировать. Поэтому лучше применять пропитывающую гидроизоляцию. Внешнюю поверхность стенок колодца обрабатывают специализированным составом. Глубоко проникая в материал, он заполняет собой поры бетона, а затем кристаллизуется. Тем самым создается высокопрочная защита, которая не боится воздействий химических соединений грунта. Лучше не поскупиться и прогрунтовать стенки ни один раз, а два. Тогда гидроизоляция будет служить столько, сколько простоят железобетонные кольца.
- Для гидроизоляции старого колодца придется откинуть грунт от его стенок на 3-4 верхних кольца вниз. Просушив и очистив от грязи поверхность стен колодца, можно обработать их методом обмазки с последующей проклейкой рубероидом в несколько слоев. Для первого слоя лучше использовать грунтовую мастику. Если использовать чистый битум, то он очень быстро пересохнет и растрескается — этот материал служит недолго.
Для создания внешней изоляции необходимо сделать наружную подсыпку, глиняный затвор и бетонную отмостку. Но эти работы будет разумно провести уже после прокладки труб и проведению работ по утеплению верха колодца.
 Другой важной задачей является проведение работ по герметизации стыков между кольцами. При монтаже ствола колодца между кольцами можно сразу уложить уплотнитель. Для этого можно использовать «Гирозолит» или «Барьер». Уплотнитель эластичен, хорошо заполняет стыки, от воздействия влаги разрастается в объеме и тем самым препятствует проникновению грунтовых вод. Когда дело приходится иметь со старым колодцем, то ремонт стыков явно необходим. Разделив стыки на глубину до 3 см под углом, следует взять железную щетку и хорошо вычистить их. Имеющиеся протечки устраняются при помощи «аквапробки». Такой является AQUAFIX. Средство представляет собой цементный состав, который мгновенно застывает при контакте с водой. Затем можно взять ремонтный состав (например, MEGACRET-40) и заделать образовавшиеся полости. Состав замечательно сцепляется даже с влажными поверхностями и не дает усадки.
- На внутренней поверхности колодезного ствола всевозможные изъяны ремонтируются аналогичным образом.
Когда ремонтный состав высох, то можно начинать гидроизолировать внутренние стенки колодца. Как отмечалось выше, при монтаже нового колодца, кольца следует обработать заранее до начала сборки ствола — тогда останется заделать только стыки.
Хорошо зарекомендовала себя обмазочная изоляция AQUAMAT-ELASTIC. Она является двухкомпонентной цементно-полимерной смесью, которая абсолютно экологична и никак не влияет на качество воды.
Перед покрытием обмазочной изоляции поверхность бетона необходимо смочить водой. Смесь удобно наносить широкой кисточкой. По еще не высохшему первому слою смеси в местах стыков можно проклеить гидроизоляционную ленту. Второй слой наносят после застывания первого. Для повторного нанесения изоляции стенки уже не нужно смачивать водой. После высыхания второго слоя (это около суток) колодец считается надежно защищенным.
Прокладка коммуникаций из дома к колодцу
После проведения работ по гидроизоляции колодца откинутый от стенок грунт не стоит возвращать на место. Самое время уложить водопроводные трубы и врезать их в стену колодца.
 Водопроводные трубы следует заглублять в землю ниже зоны промерзания почвы. При рытье траншеи стоит учесть, что на ее дне будет находиться песчано-гравийная подушка. Ее толщина обычно составляет около 10 см.
- В наше время редко кто применяет для строительства водопровода трубы из металла. Лучшим решением считается использование полиэтиленовых труб (ПНД). Для полноценного снабжения водой дачного дома разумно использовать трубы диаметром 32 мм. Для труб ПНД в магазинах и строительных рынках всегда есть большой выбор фитингов, переходников, тройников, отводов и др. Благодаря компрессионным фитинговым соединениям работа предельно упрощается и не требует применения никаких дополнительных средств и оборудования.
- Опытные мастера, как правило, советуют при строительстве водопровода от колодца до дома, укладывать не одну линию, а две. Одну трубу используют как основную линию, а вторую — как резервную, на случай неприятностей. Эта предусмотрительность избавит от работ по замене вышедшей из строя трубы.
- Для трубы, находящейся в грунте, следует создать дополнительную защиту. Трубу можно проложить внутри технической полиэтиленовой трубы либо внутри полимерного гофпатрубка с утеплением или без.
- Если траншея гарантировано вырыта ниже слоя промерзания почвы, то можно не беспокоиться за ее утепление. Однако, лучше все же перестраховаться и перед засыпанием грунта в траншею поверх труб проложить слой пенополистирола. Это решение обезопасит водопровод в очень сильный мороз.
- Слабыми участками водопровода являются места, где трубы близко поднимаются к поверхности земли, проходят цоколь или неотапливаемый подвал. Для решения проблемы стоит предусмотреть подогрев труб и прибегнуть к усиленной изоляции.
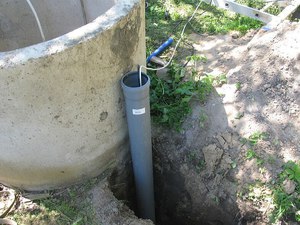
- Проем в стенке колодца для введения труб делается на уровне залегания водопровода. Ни в коем случае нельзя бурить отверстие на месте стыка колец. Во время работ по бурению края колец могут треснуть и даже подвергнуться разрушению. Оптимальным решением будет установка в сделанное отверстие резьбового сгона 1″.
- Для заполнения пространства между сгоном и стенками можно использовать пластичный герметичный состав. Подойдет гидроизоляционная мастика с армирующими волокнами. Этот же состав можно использовать для обильного покрытия стен кольца как снаружи, так и внутри. Для обеспечения дополнительной изоляции с обеих сторон надевают широкие прокладки из резины, затем шайбы, а после сгон фиксируют гайками.
- Фитинг крепится на резьбовой части сгона. ПНД труба, подводимая от дома к колодцу, крепится к фитингу. На противоположной части сгона разумно прикрепить тройник. Для того чтобы была возможность сливать воду из водопровода, к горизонтальному выводу тройника крепят кран. На выход тройника, направленному вниз, «запаковывается» фитинг. К нему присоединяется вертикальная труба. Если потребуется, то ее можно будет соединить с погруженным в воду насосом.
После всего сделанного можно переходить к работам по утеплению верхней части колодца, сделать подсыпку, глиняный замок и бетонную отмостку.
Организация системы подачи воды
Вначале необходимо выбрать тип насоса, который будет использоваться для подачи воды в дом.
Насосная станция
 Если водяной слой имеет глубину, не превышающую 7м, то лучше всего установить домашнюю насосную станцию. Выбирая нужную, руководствуются высотой подъема воды. Эта характеристика указана в паспорте на изделие. В расчеты стоит брать как вертикальные, так и горизонтальные участки трубопровода. Высота, которую создает вертикальный столб, для вертикальных труб рассчитывается из пропорции 1:1. Расчет горизонтальных участков проводится из соотношения 1 м водяного столба = 10 метров трубы.
- Участок заборной трубы собирается сразу. Ее монтаж производят так, чтобы труба погружалась в воду примерно на середину водяного слоя. В противном случае в трубу будет попадать песок и грязь со дна колодца. Установка обратного клапана обязательна.
- Установка заборного фильтра защитит от попадания в трубу крупных взвесей. Это продлит срок эксплуатации станции.
- В качестве заборной трубы можно использовать гофрированные трубы, конструктивно оснащенные обратным клапаном.
- Чтобы заборная труба была более устойчива ее можно закрепить к стенке колодца клипсами.
Погружной насос
Устанавливается если колодец глубокий — более 8 метров. Для его монтажа требуется больше усилий.
- Необходимо сразу проложить электрический кабель до колодца. Часто кабель размещают вместе с трубой.
- Насос нужно надежно закрепить на тросе.
Однако данная схема имеет свои преимущества.
- Большой напор водяного столба.
- Отсутствует шум. Для насосной станции требуется выделить в доме отдельное помещение.
- Современная модель наружного насоса уже имеет фильтр предварительной очистки, обратный клапан и поплавковую систему, чтобы отслеживать уровень воды в колодце. Если уровень снизится, то насос отключится.
- Наружный насос дешевле насосной станции.
Насос опускается на тросе на нужную глубину. Гибкий шланг или гофротруба соединяет его с тройником.
Монтажные работы в доме
 Воду, поступающую из колодца, нужно подвергать фильтрации и доочистке. Исполнение такой системы водоподготовки обусловлено выводами лабораторного анализа воды.
Реализация самой простой схемы подачи воды осуществляется при помощи установки бака-накопителя в верхней точке всей системы. Оттуда вода сможет самотеком поступать в любую точку дома. Однако, это схема несовершенна. Может применяться лишь в дачном доме, владелец которого приезжает на непродолжительное время. Напор воды в такой схеме неровный, а уровень воды нужно постоянно контролировать. Установка водонагревателя повлечет за собой проблемы.
Если установить мембранный гидроаккумулятор (ресивер) на 50 или на 100 литров, то в системе водоснабжения всегда будет ровный напор воды. После того как насос наполнит его до критического давления, сработает датчик, который отключит электричество. При снижении давления насос вновь включится.
Ресиверы обычно продаются в комплекте с насосными станциями и являются частью их конструкции.
Для погружных насосов ресивер покупается отдельно.
Заключение
В строительстве водопроводной системы, обеспечивающей подачу воды из колодца в дом, нет особых сложностей. Задача вполне выполнима. Конечно, наиболее сложным этапом работ является выкапывание шахты под колодец и последующий его монтаж. Строительство самого водопровода при наличии познаний в сантехнике по силам спланировать и построить самостоятельно любому.
Часто забывают заложить кабель для насоса из дома в колодец. С этой проблемой я столкнулся сам лично. Проложил трубы, все делал в спешке, потому что нужно было строить скорее фундамент, и кабель от реле давления к насосу прокинуть забыл в итоге.
Потом мне пришлось этот кабель вести уже по фундаменту когда фундамент был построен, дальше делать отдельное отверстие в колодце и заводить этот кабель в колодец к насосу.
Так как я делал все в гильзе 110мм (труба рыжая) и можно было не заведенный кабель просунуть по трубе, но увы, я пробовал и проволокой стальной, и полимерной арматурой, 15 м. расстояние большое, поэтому пришлось вести отдельно из котельной в колодец.
Вот видео как я закладываю ввод воды в баню и там много раз напоминаю о том что бы этот кабель не забыть заложить.
Не вывели летний водопровод.
у себя я это заложил сразу. Вывел летний водопровод из котельной через стену на улицу, просверлил дырки и сложностей у меня с этим не возникло, причём я сразу сделал ответвления при разводке воды в доме.
Но потом я столкнулся с следующей ситуацией. Шашлыки мы жарим и основное время проводим на веранде сзади дома, а кран с водой расположен в передней части дома и крайне неудобно было ходить постоянно к этому крану мыть руки или посуду и т. д.
Как вариант, конечно, можно использовать резиновые шланги, но они валяются по участку, по дорожкам и это крайне неудобно и не эстетично..
Ходишь, постоянно спотыкаешься и зимой их не оставишь.
Осенью резко наступает мороз, а вы не успели слить из них воду. Если дешёвые шланги то они трескаются, а если шланги хорошие то они замерзают и так и лежат до первой оттепели.
Как следствие я сделал вывод шланга из колодца (ниже видео как у меня это сделано). Скажу сразу, что это неправильный вариант. Правильный вариант прокладывать этот шланг в земле чтобы он не замерзал и на зиму его сливать. Потому как если его не сливать, то мороз по трубе начиная от верха этого шланга будет проникать в нашу трассу, в основную трубу и тоже прихватывать.
Поэтому мой вам совет — закладывать сразу летний водопровод чтобы у вас по участку было хотя бы две точки и вы могли им удобно и комфортно пользоваться.
Куда сливать воду из септика
Здесь следует уточнить, что подразумевается под словом “Септик”. Есть несколько видов локальных очистных сооружений, которые устанавливаются на участках, выполняя функции переработки сточных вод.
Один из них — это энергонезависимые септики.
Стоки после них могут иметь запах и не полную прозрачность. Энергонезависимый септик, упрощенно, представляет собой пластиковый отстойник, минимум с двумя камерами, в одной из которых стоки проходят процесс отделения крупных частиц с их осаждением, а в другой происходит основное биоразложение отходов анаэробными бактериями.
После такого септика осветленные стоки необходимо направлять на дополнительную очистку в специальные почвенные системы фильтрации — дренажные поля. В типичном своем виде они представляют траншеи наполненные песком и щебнем со специальными дренажными элементами, отвечающими за распределение осветленных стоков по всей площади сооружения и их равномерное впитывание в грунт.
Из энергонезависимого септика воду можно сливать исключительно в системы почвенной фильтрации.
Второй вид локальных очистных сооружений — станции глубокой биологической очистки.
Они также представляют собой пластиковую емкость, которая имеет несколько камер первичного отстоя и камеру сбора чистой воды, но главное отличие от энергонезависимых септиков — камера аэрации.
В ней стоки проходят процесс активного насыщения воды кислородом воздуха при помощи его компрессорной подачи либо эжекции ( зависит от модели).
Благодаря высокому содержания кислорода данная камера колонизируется аэробными бактериями — живущими в условиях высокого содержания кислорода. Они отличаются очень высокой активностью поглощения загрязнений, за счет чего выходе из станций биологической очистки стоки не имеют запаха и полностью прозрачны.
Осветленные стоки из станций глубокой биологической очистки допустимо использовать для полива деревьев и сбрасывать на рельеф местности.
90000 HOW TO FIND THE WATER TO THE SITE AND BUILD THE WELL — SEARCH OF THE WATER AT THE COTTAGE WITH THE HORSE AND WITHOUT. | | With Your Hands 90001 90002 If we want to have water from our own water intake, we must first take care of the choice of the site of its construction. Water, unfortunately, is capricious. It is not always in the right place and in the quantity that we need. 90003 90002 A good well on the site is a real treasure, regardless of whether it is the only source of water or used as a supplement to the water supply 90003 90002 Many people believe that water is everywhere, it is enough only to make a well at the appropriate depth.This is not true. Sometimes bore holes of depth 100 or even 200 m, absolutely dry, and only 20-100 meters to the side — and water is abundant at a depth of 10-20 m. 90003 90002 This is due to the fact that water-bearing and waterproof layers often create a real «layered pie» under the ground! 90003 90002 It happens that aquifers alternate with anhydrous literally every few dozen centimeters! Regardless of the type of research, it is difficult to give a 100% guarantee that adequate water reserves will be found.But this does not mean that research does not make sense. On the contrary, they significantly reduce the risk that drilling will produce a waterless well. 90003 90002 90013 Where can there be problems with water 90014 90003 90002 90013 The water is usually small: 90014 90003 90020 90021 on mountainous and hilly areas; 90022 90021 near the rivers, from the steeper bank; 90022 90021 near springs, artesian springs and ponds; 90022 90021 in the area of quarries and large water intakes; 90022 90021 where there are accumulations of acacia and beech.90022 90031 90002 90013 Water often has a low, poor quality: 90014 90003 90020 90021 on drained swampy areas; 90022 90021 from the side of the lower bank of the river; In this case, as a rule, the deeper the water intake, the higher the concentration of iron and manganese contained in water, even at a distance of several hundred meters from the river. 90022 90031 90042 Plants that indicate the presence of water and aquifer 90043 90002 1 The depth at which the aquifer can be located depends on the type of plants growing in this area.It is believed that each species of these plants consumes moisture from a certain depth, different for different plants 90003 90002 2 The most characteristic plants, indicating the presence of water 90003 90020 90021 Rosemary 90022 90021 Lingonberry 90022 90021 blackberry 90022 90021 boggy 90022 90021 bird-cherry 90022 90021 buckthorn 90022 90021 bearberry 90022 90021 medicinal 90022 90031 90002 Neighbors will prompt 90003 90002 Talking to the owners of neighboring sites is the easiest way to find out all the circumstances related to water: what depth of wells, whether there is enough water in them, whether it is at the same depth.It is also worth knowing what type of wells prevail in the immediate vicinity; often the type of well is based on years of accumulated experience. If you get information about the significant differences in the depth of the surrounding wells, as well as their productivity, or the site often changed owners (the reason could be lack of water) — it is best, even before purchasing the site, to clarify whether you will have trouble with water. To do this, you should order the relevant studies (see the table on page 102).The reason for fluctuations in the level and quantity of water in the wells may be a small depth of occurrence of the aquifer. The smaller it is, the more significant are the fluctuations in the water level. 90003 90002 90013 Land in the wilderness 90014 90003 90002 If you want to buy a site in an uninhabited territory where there are no wells in operation, a preliminary assessment of the availability of water on it can be done by familiarizing yourself with the terrain and species of wild plants (so-called indicators) , for example cranberries, heather, clover, birch, spruce or pine.Problems with water are often found in hilly areas, as well as near rivers. It is difficult to find the corresponding aquifer layer, and water can contain high concentrations of metals (iron, manganese). 90003 90002 Indicator plants help determine the depth of the upper aquifer. Different kinds of them grow in different places, where water is at certain depths. To avoid mistakes, it is worth to look closely at them. They should grow in large groups, be large and have different ages. If they look different, their presence may indicate not about the presence of water, but about the fact that they were planted here by humans or accidentally planted (therefore, they did not grow as a result of natural selection).90003 90002 90013 Specialized research in the search for water 90014 90003 90002 Such studies allow to determine the location and depth of occurrence of the aquifer based on the appropriate measurements and when using special equipment. Their effectiveness depends on many factors, so the choice of each method should be individual. Since none of them yield absolutely reliable results, it is sometimes useful to conduct several different studies and compare their results. In this case, the risk of an error is not reduced (it is not excluded).There is a case where, despite the positive conclusions of two different studies — dowsing and the method of electrical resistance — water was not found. The studies were conducted on an unoccupied site, where there were no significant interference that could distort the results. And yet in this place instead of water lay dry dust, which had electrical properties similar to water. Fortunately, such cases are rare. 90003 90002 The method of electrical resistance, also called geophysical. It is used to find places for water intakes of medium and high productivity.The method consists in electrical sounding of underground horizons. Based on the measurement results, a vertical section of the investigated area is compiled with the calculation of the resistivities of the individual layers. The specific electrical resistances of different underground rocks differ from the resistivity of the aquifer, which is usually from 50 to200Ohm. This method is inaccurate if there are railway lines, underground engineering networks, metal barriers, etc., etc. It is also ineffective in places where iron ore is found and on river slopes.The cost of such an investigation may be from 1,5-2 thousand UAH. Measurements last for several hours, and the results are processed after the measurements are taken. Method of potential difference. Unlike the previous method, a current is not passed through the ground through the ground, and measurements of the natural potential difference present at different points are made. 90003 90002 The change in the sign and magnitude of the potential difference makes it possible to determine the location of the water.The application of this method is limited primarily by terrain unevenness, where there is a watercourse. Trial drilling. This method is quite expensive. Two or three test wells, made with auger drill (the cheapest method), cost as much as equipping a well with pipes. Therefore, test drilling is rarely done. Most often, this method is resorted to when there is doubt about the presence of an aquifer at that location, and a large-scale water intake is planned (for example, a common well for several houses), for the construction of which an expensive drilling rig is needed.Performing trial drilling is also recommended when it is necessary to accurately determine the depth of the aquifer, its thickness and water pressure, in order to choose the type of the ring well or to establish the order of lowering the rings. If there are thin aquifers in the vicinity, trial drilling should be done with a more expensive bucket drill, but this will pay off in any case. 90003 90042 LOZOISKATELSTVO-GIVEN NOT EVERYONE 90043 90002 A dodecatcher can be a person who is not only sensitive to signals emanating from the border of regions having different structures, but also capable of correctly interpreting these signals.And this is already a matter of experience. Many people do not know about their capabilities, others overestimate them. The propensity to search can be checked by making a test — using a willow frame. They take it by the ends with both hands and pass through the bridge over the stream. People with heightened sensitivity feel the movement of the frame even before the stream; less sensitive — only on the shore or in the middle of the creek. However, there are also those who do not feel anything. Anyone who as a result of a successful test will want to seriously master dowsing, must remember that it can have a negative effect on the state of the body.90003 90002 It is often believed that the dowser detects only water. But this is not so. The movement of the frame first of all signals the presence in the ground of the boundary of various structures, because it is in such places that perturbations appear, which are felt by the dowser with the frame. This can be not only an underground accumulation of water (a pool or a water column), but also a displacement of the earth, geological ledges or extended engineering communications (for example, thick pipes).If the frame does not deviate, this can mean both lack of water and the existence of a vast, evenly distributed and uniform watered layer. Signals, the source of which are various anomalies, as a rule, can be distinguished; therefore, this controversial method is in practice extremely effective. In areas where it is difficult to stumble on water by accident, using a frame, you can get up to 80-90% of the correct readings. However, you need to know that: 90003 90020 90021 there are places where dowsing gives only 50% probability of hitting; 90022 90021 the effectiveness of this method is significantly reduced in places of conglomeration of a large amount of metal, as well as in densely built-up areas with numerous underground engineering utilities; 90022 90021 The deeper the water, the lower the accuracy in determining the depth of its occurrence; 90022 90021 if the opinions of several dowsers checking the same territory diverge, one should expect problems with obtaining water even at great depth; 90022 90021 if the location for drilling in the zone indicated by the dowser has not yielded results, then repeated drilling in the same zone will in most cases be unsuccessful.90022 90031 90042 How to perform a water search on a plot with a frame 90043 90002 1. A simple frame can be cut from a flexible young branch, for example willow. The finished frame should resemble a fork in shape. 90003 90002 2. During the test, the frame is held with both hands by the ends, while the muscles of the forearm should be very tense. If on the bank of the stream the frame arches in a special way — most likely, you have the prerequisites for dredging 90003 90002 Legal restrictions 90003 90002 When choosing a place for a well, one should not forget about the provisions of the legislation regulating these issues.Remember that for domestic water use without special permission it is possible to build a well depth to 20 meters (UA). For the construction of a deeper water intake, its project should be coordinated with the regional services (geological, sanitary and environmental), the expertise department, and also with the architects of local authorities. 90003 90002 Sanitary and hygienic regulations require the observance of sanitary gaps between wells and various objects, as well as protection from the ingress of external water into them.Proceeding from the above, the well must be located at least in 5 mtnhjd from the boundary of the site. Fortunately, this requirement is not strict. With the consent of the neighbor, the well can be made even at the border of the sites, but provided that the appropriate distances from such places as a roadside ditch, outbuildings, sewage tanks (including a septic tank) are met, or — if the drains are previously cleaned — from the filtering drainage. 90003 90042 Without contaminants 90043 90002 The normative documents also pay attention to the way the well is executed — it must be 90003 90002 protected from various contaminants coming from sewage, atmospheric or surface water.And it is right. As practice shows, the distance between the well and the septic tank or other reservoir for impurities is not the most important, but ensuring their complete isolation. The water in the well will be clean only if the contaminated reservoir, as well as the body of the well (at least in the area from the ground to the first underground impermeable layer), are absolutely hermetic. There are cases when water in the wells was contaminated with sewage or chemical compounds from a leaky reservoir, which is located at a distance exceeding 100 m! Contaminated water in these wells came from the first aquifer, slightly isolated from surface water.90003 90002 Away from home 90003 90002 To build a well is best not too close to home. Sometimes there are cases when the location of the well near the house is a threat to the stability of the house. If there are so-called floating waves under the ground, the construction of a well and its operation can cause damage to the foundation of the house with all the ensuing circumstances. For the same reason, do not place a well in the perimeter of the house. In addition, the repair of such a well and the various procedures associated with caring for it will be extremely difficult.Do not also place a well near gutters and in places where meltwater or rainwater flows or accumulates. After all, this can lead not only to pollution of water intake, but even to its destruction, especially in the case of intense precipitation. These annoys are subject to ring wells and wells with a poorly insulated head (elevated part of the well). In order to protect the well from contamination, the head of the well must be taken out at 30-70 cm above the ground surface. 90003 90002 Electricity and tree roots 90003 90002 Do not plan the construction of a well near the air power line, because there will be major problems with its implementation.None of the specialists involved in drilling wells will agree to install their equipment there. 90003 90002 This is due to the risk of damage and electric shock to people who work with him. 90003 90002 Equipment for drilling a well must penetrate deeply, so it has the appropriate length. Therefore, it is enough to take a moment off to catch the air line, and this can lead to an accident. 90003 90002 If ash, poplar or alder grow on the plot and a ring well is planned, it is necessary to construct it at a distance of at least 10-15 m from these trees or even remove them altogether.Otherwise, after a while, the roots may damage the well body. 90003 90042 We make a well according to good neighborliness 90043 90002 Wells that are built on adjacent sites are often a short distance from each other and use the same aquifer. In order to ensure the proper productivity of water abstraction in this situation and at the same time not to take water from neighbors, it is necessary to remember the observance of several principles. If the wells have the same diameters, water problems most often occur in the shallower ones.In the case of ring wells, the situation can be corrected by increasing the depth of the shallower one by 0,5 m (as a rule, this is enough). If the wells are of different diameters, the deeper should be one with a smaller diameter, of course, if the thickness of the layer allows. 90003 90002 In conclusion, an important remark. It should also be remembered that the construction of a well in the correct location will not ensure that there is sufficient water in the house if the water supply equipment, eg a pump, is improperly selected.90003 90042 Comparison of the effectiveness of different methods of water search — table 90043 90146 90147 90148 90149 90150 90013 Search method 90014 90003 90154 90149 90150 90013 Acquaintance with locality. 90014 90003 90154 90149 90150 90013 Study of Growth 90014 90003 90154 90149 90150 90013 Dowsing 90014 90003 90154 90149 90150 90013 The study of vegetation 90014 90003 90154 90149 90150 90013 The potential method 90014 90003 90154 90149 90150 90013 Geological maps 90014 90003 90154 90149 90150 90013 Test drilling 90014 90003 90154 90197 90148 90149 90150 Where to apply 90003 90154 90149 90150 Settled on a flatland 90003 90150 -Noah 90003 90150 territories 90003 90154 90149 90150 on the ground 90003 90150 з 90003 90150 wild-growing plant 90003 90154 90149 90150 on the territory without underground communications 90003 90154 90149 90150 in large 90003 90150 and deep aquifers 90003 90154 90149 90150 on 90003 90150 slopes 90003 90154 90149 90150 when a large water intake 90003 90154 90149 90150 everywhere, as an auxiliary technique 90003 90154 90197 90148 90149 90150 90013 When to apply 90014 90003 90154 90149 90150 all year round 90003 90154 90149 90150 from spring to autumn 90003 90154 90149 90150 at a temperature above -5 ° C 90003 90154 90149 90150 almost 90003 90150 round 90003 90150 year 90003 90154 90149 90150 — 90003 90154 90149 90150 all year round 90003 90154 90149 90150 almost year round 90003 90154 90197 90148 90149 90150 90013 What can distort the readings 90014 90003 90154 90149 90150 different performance evaluations 90003 90154 90149 90150 planting 90003 90150 -one 90003 90154 90149 90150 drainage, large earth mixing 90003 90154 90149 90150 railways, metal fencing 90003 90150 and so on.90003 90154 90149 90150 surface- 90003 90150 shifts 90003 90154 90149 90150 inaccuracy of maps 90003 90154 90149 90150 water lenses 90003 90154 90197 90326 90327 90002 For any inquiries, We’re here to answer you. 90003 90330 90147 90148 90333 90002 What can 90003 90002 identify 90003 90154 90149 90002 aquifer thickness 90003 90154 90149 90002 + 90003 90154 90149 90002 — 90003 90154 90149 90002 + 90003 90154 90149 90002 + 90003 90154 90149 90002 — 90003 90154 90149 90002 — 90003 90154 90149 90002 + 90003 90154 90197 90148 90149 90002 pressure in the layer 90003 90154 90149 90002 + 90003 90154 90149 90002 — 90003 90154 90149 90002 — 90003 90154 90149 90002 — 90003 90154 90149 90002 — 90003 90154 90149 90002 + 90003 90154 90149 90002 + 90003 90154 90197 90148 90149 90002 productivity 90003 90154 90149 90002 + 90003 90154 90149 90002 + \ — 90003 90154 90149 90002 + (conditionally) 90003 90154 90149 90002 + (conditionally) 90003 90154 90149 90002 + \ — 90003 90154 90149 90002 + 90003 90154 90149 90002 + \ — 90003 90154 90197 90148 90149 90002 water quality 90003 90154 90149 90002 + 90003 90154 90149 90002 — 90003 90154 90149 90002 — 90003 90154 90149 90002 — 90003 90154 90149 90002 — 90003 90154 90149 90002 + 90003 90154 90149 90002 + 90003 90154 90197 90148 90149 90002 place under the well 90003 90154 90149 90002 + \ — 90003 90154 90149 90002 + 90003 90154 90149 90002 + 90003 90154 90149 90002 + 90003 90154 90149 90002 + 90003 90154 90149 90002 + 90003 90154 90149 90002 + 90003 90154 90197 90326 90327 90002 Water lenses are underground pools of small capacity, in which water does not flow constantly.»The productivity of the layer also depends on the diameter and type of the well 90003 90002 The table shows only the most effective ways of determining underground water supplies. Unfortunately, none of them gives an absolute guarantee that the place under the well will be determined correctly, although under favorable conditions their effectiveness may be high 90003 90002 90013 Where can I build a well 90014 90003 90518 90021 not closer than 15 m from the sewage tank, for example a septic tank, a compost pile 90022 90021 not closer than 30 m from the drainage pipe, which filters biologically treated effluents; if the effluents are not biologically cleaned, then both from the drainage pipe and from the boundary of the filtering field — not less than 50 m 90022 90021 not closer than 15 m from farm buildings, hermetic silo pits 90022 90021 Residential house — without determining the minimum distance to the well 90022 90527 90002 90013 Wells located near 90014 90003 90002 If two wells of different diameters, located at a short distance, will use water from one aquifer, the narrowest of them should be deeper.Then there will be enough water in each of them. 90003 90518 90021 A ring well of a larger diameter should be less deep 90022 90021 static water level in the aquifer 90022 90021 dynamic water level in wells 90022 90021 Well (well of smaller diameter) should be deeper (more recessed into the aquifer) 90022 90021 the difference between the static and dynamic level (lowering the water level in the well during its intake) 90022 90527 90042 How to make and protect a ring well 90043 90002 That the operation of the well does not violate the sanitary requirements, during its construction it is necessary: 90003 90020 90021 Seal the seams between the rings and bring the head over the ground level to the required height; 90022 90021 make a clay «castle» along the perimeter of the head, and then a blind with a slope of 5% of the well; 90022 90021 close the head cover, and from above cover it with a canopy.90022 90031 90002 90013 Ring well 2 options: drawing diagram 90014 90003 90002 90003 90564 90013 1 Ring well without pump 90014 90567 90518 90021 on the perimeter of the head, the soil should be compacted to a width of 1 m, and the top is a blind area with a slope of 5% from the well 90022 90021 all internal cracks between the rings along the entire wellbore should be wiped (this does not apply to wells with lateral water intake) 90022 90021 (if water contains a lot of iron, then it is better to make a lid in the form of a canopy that would let light and air into the well — this will improve the quality of water) 90022 90021 The head of the well must be raised above the ground surface by at least 0,7 m 90022 90021 gaps between the rings on the outside should be ground to a depth of at least 1,5 m from the ground 90022 90527 90564 90013 2 Ring well with pump 90014 90567 90518 90021 on the perimeter of the head, the soil should be compacted to a width of 1 m, and the top is a blind area with a slope of 5% from the well 90022 90021 tight fitting lid — must withstand the specified loads 90022 90021 all internal cracks between the rings along the entire wellbore should be wiped (this does not apply to wells with lateral water intake) 90022 90021 The head of the well must be raised above the ground surface by at least 0,3 m 90022 90021 gaps between the rings on the outside should be wiped to a depth of at least 1,5 m from the ground surface (special attention should be paid to the points of withdrawal of the pipes of the water supply system) 90022 90021 pump 90022 90527 90002 See also the topic entry.How to make a concrete pit in your country house with your own hands 90003 90600 90601 TOOLS FOR MASTERS AND MASTERS, AND HOME GOODS ARE VERY CHEAP. FREE SHIPPING. THERE ARE REVIEWS. 90602 90603 90564 Below other entries on the topic «How to make your own hands — a householder!» 90567 90021 As with the help of improvised means, you can measure the required amount of fertilizer Memo for the gardener — the mass … 90022 90021 Shrub pruning — gardener memo table FEATURES OF CUTTING OF SHUSTERS — AGRONOM… 90022 90021 Solutions for processing and spraying seedlings by hand How to prepare solutions for seedlings … 90022 90021 Bench for the bath with your hands — photo Shop for a bath — like … 90022 90021 Legend: flooring, laminate, ceramic tiles Laminate and tile — conditional … 90022 90021 Flower container with own hands made of wood — drawing How to make a wooden container for … 90022 90021 Top dressing for a garden — a schedule and the VALUABLE practical experience MY EXPERIENCE, REVIEWS AND FEEDING… 90619 90620 Subscribe to updates in our groups and share. 90567 90620 Let’s be friends! 90567 90022.90000 HOW TO DRIVER WATER TO THE PRIVATE HOUSE. CLEANING AND RESETTING USED WATER. | | With Your Hands 90001 90002 Pump equipment 90003 90004 If water is taken from the well, a pumping system is constructed. Its design depends on the diameter and depth of the well. A conventional centrifugal pump can not pump water from a depth of more than 9 m. For this purpose, a special submersible pump is designed. Its parameters depend on the flow of water and head. If the pump delivers water from a depth of 20 m, and its nominal head is 50 m, the water pressure on the surface will be 30 m, or 3 atm.And if you take into account its delivery to the second floor and the loss of hydraulic resistance — about 2 atm. This is not enough. Usually, if the well is not far from a house that has no more than three floors, the pump is selected from the calculation of 40 m head «plus» the dynamic water level «plus» 20%. The required pump capacity, measured in l / min, should be equivalent to the number of draw-off points multiplied by six (water flow from one tap). Another option is a pumping station. It can be placed in a well near the well or in the basement of the house.A station with a centrifugal pump necessarily includes a check valve on the inflation line so that when it is lifted, the water column does not fall back into the well. The pump is fitted with a coarse filter, a shut-off valve and a pressure switch. The latter is necessary to shut down the pump when the pressure in the water supply system reaches 3,5-4,5 atm. (The water is not consumed, the accumulator is full). Then connect the accumulator. It smoothes the water hammering that occurs when the pump is started, and also serves to accumulate 20-80 l water, depending on its size.If the tenants need a little water — for example, to wash their hands or use the toilet — water for these purposes will provide the stock accumulated in the accumulator. The fewer pump starts, the longer the system will last. 90005 90002 Types of pipes for plumbing 90003 90004 Steel pipes in a modern private house — an anachronism. Usually choose between copper, polyethylene, polyvinyl chloride or metalloplastikovymi. If we are talking about a hot water supply system, to this list add pipes from modified heat-resistant polyvinyl chloride.The pressure in the water supply system of a private house is small (it does not exceed 5 atm.), So pipes suitable for its installation are suitable for any pressure. and copper pipes are the most reliable (their service life is 60 years and more) and at the same time expensive. They are easily bent, and breakthroughs in them are practically excluded. But the use of such pipes in a private house is hardly justified: they will survive the construction itself. And the water in them quickly cools. Polyethylene pipes are the cheapest.They are harmless to health and chemically inert. Connect with welding, threaded connections or crimping. Polyvinyl chloride pipes are easy to install. And polyvinylchloride allows you to make permanent joints by gluing together, and to produce reliable enough shaped products with thread. and the metal-plastic pipes are convenient in that they keep the shape after bending, so that their marking and cutting do not require high accuracy. Some of the plastic pipes have a centimeter marking, which helps to carry out calculations.Pipes need to be laid before finishing works, so that the latter can hide the wiring 90005 90002 Water supply schemes for a private house 90003 90004 In the general collector water is divided into hot and cold. The branch of hot water is additionally equipped with a water heater — flow or storage. Further, the distribution of water supply pipes is possible according to two schemes: sequential and parallel, with common collectors for cold and hot water. The first scheme requires fewer pipes, so it is cheaper.However, it has a drawback: during a significant draw-off, the pressure in the near cranes is higher than in the far ones. In addition, the waiting period for heated water in distant areas may be significant (the water in the pipes cools). The diameters of the main pipeline are usually 32-40 mm, the taps to the draw-off points are 16 mm. But if the output of two consumers (put a tee for branching) or assume a large flow, use a pipe diameter of 20 mm. More popular is the parallel wiring: from the «comb» — the collector — a separate pipeline is laid to each point of the draw-off.The «comb» can be several. This scheme, unlike the previous one, is convenient in that the pressure and flow in all branches of the collector are the same, and the hot water path from the heater to the consumer is less. Another advantage is the absence of hidden connections in the floors or walls, which in the event of an accident greatly facilitates the repair work. Disadvantages — more pipes and a higher cost. The diameter of the pipes leading from the collector to the points of draw-off, as in the previous case, is equal to 16 mm.According to this scheme, no more than two pumping points located side by side are connected in series, which, as a rule, do not operate at the same time (for example, a bidet and a washbasin), and a pipe with a diameter of 20 mm is used. Hot water supply allows a third, closed circuit — the most convenient for residents. In this case, a built-in pump is used to circulate. Due to this, the temperature of the hot water is maintained (outside the circulation zone, the length of the pipe sections does not exceed 1 m), and its waiting time is minimal.Towel warmers can be attached to this pipeline, which will play the role of heating devices, which will allow them to use also when the heating system does not work. Disadvantages of this scheme are increased heat consumption, significant pipe length and the highest cost. In addition, it is necessary to install a non-return valve in the supply line of the oxen to the hot water supply system. 90005 90004 90005 90002 Installation of meters for water 90003 90004 The owners of private scraps connected to the centralized water supply do not need pumping equipment, but they can not get a water meter on the water.Homeowners are dealing directly with the vodokanal, which maintains an autonomous account of used water. And if the house is not equipped with a special meter, the owner will have to pay an inflated rate, which the vodokanal indicates. When concluding a water supply contract with a water canal, the landlord must provide project documentation, which indicates the diameter of the pipeline and the conditional amount of necessary oxen. On the basis of this information, the Vodokanal issues a certificate-recommendation, in which it is written, which counter is suitable for this building.The meters are installed by specialists of organizations that have a state license to install such equipment. Having sealed the counter, the representatives of the water canal issue the act of acceptance and commissioning to the client. It records the readings from which the countdown begins. 90005 90002 Pipeline laying 90003 90004 Pipes of water supply, usually before finishing works and pouring the floor under it or on walls and then hide under plaster, ceramic tile or concrete screed. Often there are special channels for pipelines.Hot water pipelines must be provided with thermal insulation. It can be a polyethylene foam shell or a conventional corrugated sleeve. Isolation not only performs its direct function, but also provides compensation for temperature deformations. As a general rule, the ball valves are placed in front of the detachable assemblies so that in the event of an accident or routine maintenance, it is possible to cut off the necessary branch of the water pipe. For serial connection, ball valves are usually placed near the points of draw-off, on branches.If you have chosen a parallel circuit, there are enough cranes located on the collector: with their help you can turn off any branch. In addition to pipes for laying the water supply, the so-called fittings — corners, tees and couplings — will be needed. Maintenance-free joints (those that hide plaster or concrete) are made integral, and those that can be accessed are detachable (threaded). Usually, one-piece joints are preferred, since threaded ones are less reliable. After installation, but before sealing in the walls or the floor, the branch of the water pipe must be pressed — fill with water under pressure above the working one and leave approximately for a day with the pump disconnected.This is necessary to timely detect and eliminate leaks. The pressure in the branch is monitored by means of a manometer. If it is unstable, you need to look for leaks in the joints and redo the site. Soldering is an easy, and therefore a common way of connecting plastic pipes. If necessary, pipelines should be insulated with foamed polyethylene 90005 90002 Filtration of tap water 90003 90004 Miraculous systems that make water absolutely pure, do not exist. In addition, the «ideal» water intended for drinking and domestic needs varies in composition.For example, for washing, bathing and dishwashing, soft water with a minimum content of hardness salts is most suitable, and in the case of a drinking oxen, a certain hardness is best appreciated: solutes dissolved in water improve its taste. To get quality water from a natural well, use regenerated filters or a membrane water purification unit that works on the principle of reverse osmosis (nanofiltration). The content of hardness salts and iron in water from a water pipe is usually acceptable.Only water intended for drinking, it is desirable to cleanse from residual chlorine and chlorine-organic substances. With this task, the installation of reverse osmosis of low power successfully copes. Such installations are often used and in order to additionally clean the deferred and softened water for drinking. The primary analysis of water is carried out by certified laboratories and firms involved in the installation of water treatment equipment. Their services can be free of charge (express analysis for stiffness, iron content and pH) or paid:.Based on the results of the analysis, the quantity and type of equipment are chosen. The deironing unit with a pressure aerator is used at a high iron content in the initial water. This scheme also allows you to get rid of hydrogen sulfide. 90005 90004 By the way, of course, it may not be entirely in keeping with the topic, because here we are talking about water supply, but also a useful article — How to find water on the site yourself — search for water with a vine and without 90005 90002 The device of a cesspool 90003 90004 The simplest and cheapest solution to the problem of recycling wastewater is a sealed container in which waste water is collected from the house.They are pumped out as the pit is filled. The use of pits without a bottom with filtration is prohibited. Waste water storage facilities should be designed in the form of wells. To maximize the use of their volume, sewage oxen are fed as high as possible. The bottom of the well should be at a depth of no more than 3 m from the ground surface (so that the sewage system can drain the sewage). Such a cesspool is constructed of prefabricated reinforced concrete rings, monolithic concrete or solid clay bricks and is provided with waterproofing.The accumulator is covered with a lid, which must provide thermal insulation (use mineral wool or polystyrene). If it is necessary to increase the volume of the settler, it is possible to provide several tanks connected by a branch pipe. The level of accumulation can be controlled by installing a float switch. Alya ventilation in the ceiling of the drive is installed a riser with a diameter of at least 100 mm with an output of 700 mm above the planning level of the ground. And most importantly, you need to provide access to the sump of the sewage machine.Disadvantages of the cesspool are possible odor, dependence on the efficiency and cleanliness of the sewage system, as well as payment for cleaning services. 90005 90002 Biological cleaning systems 90003 90004 This is perhaps the most effective method of wastewater treatment. It is based on the vital activity of microorganisms originally present in sewage oxen. Such purification systems are of two kinds. The first one is self-supporting, they are simply buried in the ground, only hatches for maintenance leave the surface.In places where they are installed, transportation is prohibited. The second is non-load bearing, they are mounted inside ferro-concrete wells in the places of transport passage or with a high level of groundwater. Both do not need a bacterial «leaven». With the help of aeration (artificial air supply), biological processing of sewage is accelerated, and harmful organic substances are oxidized, decaying into harmless ones. The main equipment of such cleaning systems is divided into compartments: a primary settler (in fact, the same septic tank), an activator and a secondary settler.Sewage enters the primary settling tank, where floating pollution is separated from heavy components. Pre-cleaned waste fluid is sent to the activator, to the bottom of which (with the help of a compressor) air is supplied. In an oxygen medium, microorganisms absorb and oxidize organic substances. After processing a portion of these substances from the purified water, the activated sludge is separated, which returns to the contaminated runoff. In such installations there are no unpleasant odors, and the degree of sewage purification at the outlet is about 98%.Purified water goes to the ground through drainage ditches or wells. In fact, they resemble other wells. But, firstly, they are almost three times smaller. And secondly, due to the high degree of cleaning of the oxen (up to a septic tank — 98%, after — 50-60%) drainage devices in the foreseeable future are not threatened with siltation, and the owner — a significant amount of «dirty» work. The main disadvantage of a biological purification system is energy dependence 90005 90002 Natural cleaning systems 90003 90004 A septic tank is an underground sedimentation tank consisting of one or more compartments through which sewage flows in succession.In septic tanks, mechanical cleaning takes place (due to sedimentation of water with formation of sediment and floating substances), as well as partial biological purification (due to the decomposition of organic contaminants). In addition, in septic tanks, flotation treatment of wastewater is carried out with the help of gases released during the decomposition of the sediment. They split complex organic molecules into simpler ones. As a result, the effluents are cleared of suspended solids by 50-60% and from organic compounds — by 30-40%.After that, they enter the field of filtration (biofilter), where the cleaning takes place in a layer of rubble and surrounding layers of soil under the action of biofilms of bacteria. The filter layer in this structure is gradually clogged by suspended particles. Through 5-10 years it will need to be replaced or washed. Such an individual sewerage system is suitable if the site is located on filtering grounds (sand, sandy loam), ground water is at a depth of at least 2 m, and in the radius of 25 m there are no wells for drinking water supply.The minimum distance from the septic tank to the dwelling should be 5 m. The insoluble fractions at the bottom of such a settler must be taken out once or twice a year. The septic tank is non-volatile (that is, its operation is not related to electricity) and is inexpensive compared to the intensified bio-purification system. 90005 90002 Requirements for external pipelines 90003 90004 Laying external sewerage systems, it is necessary to comply with SNiPs. Here are their main requirements: The minimum diameter of external pipelines for gravity sewerage should be 100 mm, slope — 0,01%, and if pipe diameter 150mm — 0,008%; The minimum depth of laying pipelines from the ground to the top of the pipe in places where vehicles can travel must be at least 0,7m, in other places — 0,5 m.It is desirable to lay pipelines below the freezing depth (1,2-0,8 m), otherwise the sewage obstruction is not excluded. If pipelines have to be laid above the depth of freezing, they must be insulated (sprinkled with an ass, claydite or other materials). In this case, it is necessary to protect the thermal insulation from water, draining the construction site; Wells must be covered with covers with thermal insulation, so that the sewage pipes do not freeze; The angle between the connecting pipe and the discharge pipe must be at least 90 °.If the technology is not met, the system can not cope with the discharged water and sewage. 90045 90045 90005 90048 90049 TOOLS FOR MASTERS AND MASTERS, AND HOME GOODS ARE VERY CHEAP. FREE SHIPPING. THERE ARE REVIEWS. 90050 90051 90052 Below other entries on the topic «How to make your own hands — a householder!» 90053 90054 Laying and installation of drainage pipes on the site with their own hands How to make the installation of drainage … 90055 90054 Water in the country with their own hands is the cheapest way We spend the water in the holiday home… 90055 90054 What and how to do — a well or a well? What is better is a well or a well … 90055 90054 How to punch a stopper in a sink (blockage) How to get rid of blockage? If clogged … 90055 90054 How to get rid of the water that accumulates in the cellar, if the floor with a slope The water in the cellar is like … 90055 90054 How to check the quality of pipes Checking the quality of pipes Repair in the apartment … 90055 90054 How to make a metal-plastic plumbing installation for a mixer in the bathroom How to draw water in… 90067 90068 Subscribe to updates in our groups and share. 90053 90068 Let’s be friends! 90053 90055.90000 How to Clean Your House Like a Pro: From Top to Bottom in 4 Hours 90001 90002 Cleaning Tips From a Professional Cleaner 90003 90004 You can clean virtually any house in about four hours a week. I learned this when I had my own residential house-cleaning business. One reason that cleaning other people’s houses is a lot easier than cleaning your own, is that you’re not involved in the mess. Nothing is personal and you do not get distracted while you’re cleaning. 90005 90004 You can clean your own house just as efficiently if you do not get distracted.You can also save money instead of hiring a professional house-cleaning service. My five-step method includes: 90005 90008 90009 Setting a Cleaning Schedule 90010 90009 Cleaning Bathrooms 90010 90009 Cleaning Ceilings and Walls 90010 90009 Dusting 90010 90009 Cleaning Floors 90010 90019 90020 Learn How to Prioritize Your Cleaning Needs 90021 90004 Household chores like intensive kitchen cleaning and laundry are better left for another time as they can distract you from your mission.I assume the dishes are generally washed and counters wiped down every day. 90005 90004 If you are efficient, you can run the dishwasher or washing machine while you focus on the tasks at hand. We will talk about some techniques to tackle these chores towards the end. I do suggest including the kitchen when you are clearing cobwebs, dusting and cleaning floors. 90005 90002 Cleaning Supplies You Will Need 90003 90004 It will make your job simpler if you have quick access to everything you need.It is a good idea to use a storage caddy or a bucket with a handle so you can carry your supplies from room to room. 90005 90004 In your cleaning caddy you should have: 90005 90008 90009 Sponge (with a scrubby side) 90010 90009 Cotton rags (I like cloth diapers or old terrycloth washcloths. Old t shirts make good rags too. If you use old towels or clothing, cut them up so it’s easy to tell that they have been retired.) 90010 90009 Microfiber cloths 90010 90009 Paper towels 90010 90009 Bathroom cleaner 90010 90009 Glass cleaner 90010 90009 Furniture polish 90010 90009 Rubber gloves 90010 90009 Floor cleaner and / or polish 90010 90019 90002 A Little Advice About Cloths and Rags 90003 90004 90055 Microfiber cloths 90056 are very popular, and they are great for some jobs.They work fine for dry dusting, cleaning woodwork, and final polishing. However, they are not very absorbent. Most of the time you will want to use them either dry or slightly damp. They are not good for drying dishes, but they are great for rubbing off water spots. If you use spray cleaner and a microfiber cloth, it will not dry the surface very well. In that case you are better off to use a paper towel or a cotton cloth or rag. 90005 90004 90055 Paper towels 90056 are good for very nasty or greasy messes that will contaminate your sponge or rag, things like the outside of the toilet.On the top of your stove you can use a paper towel for the initial clean-up and then move on to a sponge or rag. 90005 90002 Other Necessary Tools 90003 90008 90009 Long-handled duster 90010 90009 Vacuum cleaner 90010 90009 Broom 90010 90009 Dust mop 90010 90009 Wet mop 90010 90019 90002 Buy a Decent Vacuum Cleaner 90003 90004 For years I had problems with vacuum cleaners. I bought one cheap one after the other. It seemed like I was spending more time unclogging them than I was vacuuming.90005 90004 I finally bought myself a Kenmore canister vacuum. I’ve had it for ten years now, and it solved most of my problems. Of course, it still needs maintenance. As long as I empty the bags when needed and clean the filters it has good suction. The hose finally cracked a couple of years ago, but I was able to get a replacement on ebay. 90005 90004 I would warn against the bagless vacuums, I never had any luck with those, and emptying the dirt cup is a messy job. Uprights seem appealing and easy to use, but if there’s a clog it’s hard to get to it.90005 90002 How to Deep Clean Your House Fast 90003 90004 If the house has not been kept up, you will probably find a lot of dusty corners that have not been cleaned in a while the first time you clean. This is what I found any time I got a new client, no matter how tidy the house looked. 90005 90020 Cleaning vs. Clearing Clutter 90021 90004 The first thing to understand is that there’s a difference between clearing clutter and cleaning. A lot of times when we’re cleaning our own houses, we do both at the same time, but this is not the most efficient way.90005 90004 When a professional cleaner comes in, the house is generally expected to be «picked up.» If I would come in to a house to clean it and there was stuff lying around, I would simply make piles for the homeowner to sort out later. 90005 90020 Cleaning to Remove Dust Mites 90021 90004 It’s important to clean more frequently throughout the year rather than just a little «spring cleaning.» Those untouched areas can harbor dust, mites and other irritants that should be removed regularly for health and wellness.90005 90004 Dust mites can cause allergies and asthma. They like to live in fabrics and soft bedding, like mattresses, pillows, carpets, rugs and blankets. This is why weekly cleaning is important. 90005 90002 Step 1: Set a Cleaning Schedule or Cleaning Routine 90003 90004 The key to keeping your house clean is organization and consistency. If you stick to a cleaning schedule and do the entire house each week, you will probably find that it will take you less time to do your basic cleaning.Then you can catch up on those other tasks that you do not need to do weekly. 90005 90004 You might want to keep a running list of those, so they do not get overlooked. Some of these tasks might include cleaning: 90005 90008 90009 the inside of the refrigerator 90010 90009 stove 90010 90009 oven 90010 90009 kitchen cabinets 90010 90009 medicine cabinet 90010 90009 light fixtures 90010 90009 books on book shelves 90010 90009 behind and under heavy furniture 90010 90019 90002 Step 2: Start Cleaning the Bathrooms 90003 90004 The first thing I do is to start on all of the bathrooms at once.Remove everything from the tubs and showers and spray them with the bathroom cleaner you prefer and leave them to soak. Do the same with the toilet bowls. Put the cleaning products in and give them an initial swish with the brush. This is a good time to take a trash bag with you and empty all of the waste baskets. 90005 90002 Step 3: Change Bedding 90003 90004 Gather the clean sheets and pillowcases you will need for all bedrooms. Go to each room, strip the sheets and remake the bed. Gather all the soiled sheets and take them to the laundry room.90005 90004 It is important to make the beds before dusting the ceilings in the bedrooms. This avoids getting dust under the covers. If the ceiling is particularly dusty, you may want to cover the freshly made bed with a sheet while dusting the ceiling. 90005 90002 Step 4: Clean Ceilings and Walls From Top to Bottom 90003 90004 While my bathroom-cleaner products are working in the bathrooms, I start on cobwebs and dust on the ceilings, corners and door jams, and work methodically around each room.Work your way all the way down the walls to the baseboards. A Webster works OK for corners, but I think it works better if you cover it with a cloth-the cloth is just better at wiping off those sticky webs. 90005 90004 I like to use a Casabella® Everywhere Duster for the walls and ceiling. This is a better alternative than your standard feather duster because it’s made of microfiber and it’s washable. If you do not have one, you might try your favorite microfiber mop. Before they were available, I used to use a broom with an old towel tied over it to sweep the ceiling.Clean light fixtures and fan blades while you’re doing this. 90005 90020 When to Clean Light Fixtures 90021 90004 If you have light fixtures that are really dirty or full of bugs, you will not be able to take them all down and wash them within your 4-hour time period. For that type of job, you can do one or two of them a week until they’re all caught up. 90005 90004 A good way to clean glass shades on a light fixture is the dishwasher. It is easier and more thorough than washing them by hand.90005 90002 Step 5: Finish Cleaning the Bathrooms 90003 90004 By the time you’ve removed all the webs and dust, you’re ready to finish the bathrooms. I used to use a broom to scrub tubs and showers, but now Mr. Clean makes a nice tool for cleaning the bathroom. It is called the Magic Reach. It does a good job of scrubbing and you can reach the whole shower easily without throwing your back out. 90005 90004 When you are through cleaning, put all the shampoos and things back in the shower and do the vanity and mirror, scrub the sink and polish all the fixtures.90005 90020 Clean the Toilet Bowl 90021 90004 Now you are ready to finish cleaning the toilet bowls. Do not forget the rubber gloves for that job. I use a small wastebasket with a bleach solution in it to disinfect the toilet bowl brush after use. Paper towels are good for wiping the outside of the toilet and the seat to avoid contaminating other cleaning cloths with bacteria. 90005 90020 Clean the Bathroom Floor 90021 90004 Clean the floor last. I find it easier and more thorough to clean the bathroom floor with a rag instead of a mop.90005 90020 Some Advice About Cleaning Cloths 90021 90004 I keep some old cotton rags for jobs like cleaning the bathroom floor. Once the job is done, those rags go straight into the washing machine. Old t shirts and towels make great rags. Cloth diapers also make excellent cleaning rags. 90005 90004 Microfiber cloths are great for dusting, and cleaning the fronts of cabinets, door jams, window sills and light switch plates. They are also great for polishing chrome kitchen and bathroom fixtures, but they are not very absorbent.90005 90020 The Best Way to Clean Your Shower Curtain 90021 90004 If your shower curtain has mildew, you can wash it in warm water on the gentle cycle and hang it back in the shower to dry. 90005 90002 Step 6: How to Dust Your House 90003 90004 Now that the hard part is done, you’re ready to start dusting. 90005 90174 90009 90055 Furniture: 90056 Starting at the top and remove all small items from the shelves and table tops. Polish wood surfaces with whatever oil or wax you prefer. 90010 90009 90055 Lamps: 90056 If the lamp shade is covered in fabric, remove it and set it aside to be vacuumed.Wipe off the lamp itself and lift it to dust underneath. 90010 90009 90055 Knick Knacks: 90056 Wipe each item from the shelves and coffee tables down before putting them back. You’ll want to use a separate rag with Windex or something similar for dusting those items, so they do not get smeared with oil or wax. 90010 90187 90020 How to Clean Books on Shelves 90021 90004 Thoroughly dusting books on shelves are another one of those jobs that you can take on once every few weeks. You can dust the shelves and fronts and tops of the books each week, but occasionally it’s good to take all the books off the shelf and dust each one.90005 90002 Step 7: Vacuum and Mop Floors 90003 90004 When all of the dusting is done, you’re ready to vacuum. Vacuum in this order: 90005 90174 90009 90055 Lamp shades: 90056 Vacuum the lamp shades and put them back in place. 90010 90009 90055 Furniture: 90056 Upholstered furniture should be vacuumed each week as well. 90010 90009 90055 Floor corners: 90056 Use the corner tool first to get the edges and corners of the floor. Then move on to the rugs and carpets. 90010 90009 90055 Hard floors: 90056 Clean the hard floors.I use my canister vacuum cleaner for that job, but if you have an upright vacuum, you may want to sweep. 90010 90187 90004 If the linoleum or tile floors are really dirty with stuck-on dirt, I use a roller-head sponge mop and bucket. If they are only moderately dirty, I use a slightly damp microfiber mop. It works really well. If there’s a difficult spot, you can use a damp cloth by hand. For hard wood or laminate flooring, follow the manufacturer’s instructions for cleaning. 90005 90002 Laundry Tips 90003 90004 If you are an efficient person, you can consider running your washing machine while you clean your house.This might make sense if you use your weekend for laundry and deep cleaning. I like to wash occasional loads throughout the week instead of letting laundry pile up. 90005 90004 90055 Remove All Laundry From the Rooms 90056 90005 90004 Before you begin cleaning your bathrooms and bedrooms, remove towels and bedding from these areas as part of the picking up process, this allows you to reach all surfaces that would otherwise be hidden. You can put the bedding and towels straight into washer.90005 90004 One problem with doing laundry while cleaning is that you risk wrinkled clothing if you do not get to the folding right away. It’s not such a problem with towels, and bedding. 90005 90004 I have a hanging rod above my washer and dryer where I hang shirts right out of the dryer. Most shirts will not need ironing if you do that. 90005 90020 90055 Tips for Deep Cleaning Your Kitchen 90056 90021 90004 To start, you may want to wash all of your dishes, dry them, and put them away or run your dishwasher and let them vent.When cleaning your kitchen, do the following: 90005 90008 90009 90055 Wash your cutting boards: 90056 Remove all cutting boards and objects from the counter. Use a sponge with warm soap and water and wipe down the tops and bottoms of your cutting boards. Rinse with hot water. Let dry. 90010 90009 90055 Organize your drawers: 90056 Do you have a drawer full of containers? Take the time to arrange them by size and style. Create a streamlined pile for the lids. Consider sorting your utensil drawer as well.90010 90009 90055 Dispose of expired food: 90056 Go through your pantry and refrigerator and get rid of expired food. 90010 90009 90055 Clean your refrigerator: 90056 I start with the shelves in the doors. Remove all items from one shelf and clean the shelf with a damp cloth. If your shelves are very sticky, you may need to spray them with an all purpose cleaner, or some soapy water, and let them soak for a few minutes. Wipe off each bottle or container before putting it back. In this manner, clean all of the the shelves.You will need to occasionally remove all crisper drawers and clean under them. Also wash out the drawers themselves. 90010 90009 90055 Wipe down your drawers 90056: Empty each drawer and wipe it out. Wipe down all cabinet surfaces. I like to use a clean sponge with a scrubby side or a damp microfiber cloth. 90010 90009 90055 Clean cabinet faces: 90056 This is where you microfiber cloth might be a good choice. If that’s not enough by itself try 409 or a similar commercial cleaning spray. If it’s a really tough job, try Magic Eraser.90010 90009 90055 Clean your stove: 90056 To clean your stove top you can use an old sponge to clean underneath the grills with a little soap and water by lifting them. Scrub stuck on debris with a little baking soda; it is very effective at removing stubborn grease. By the time you are through with this task, your sponge will be ready for the trash. 90010 90009 90055 Clean your microwave: 90056 First, soften hard debris inside the microwave by placing a cup full of water or a wet cloth inside and running it for a minute.The steam will soften stuck-on food and make it easier to clean. Remove the microwave plate and soak it in warm, soapy water. Wash and dry it. Wipe the microwave inside and out using your cleaner of choice and a damp sponge or cloth. 90010 90009 90055 Clean your sink: 90056 You can use a sponge, warm water and dish soap to clean your sink. I use Dawn dish soap. Dishwasher soap is more effective if you have a stained sink. If your sink has already been scratched by abrasive cleansers such as Comet or Ajax, you may have no choice but to continue using them to get your sink clean.Just make sure to rinse the sink well, especially after using anything containing bleach. If you leave it on it can discolor or damage sink surfaces. 90010 90009 90055 Perform a final wipe: 90056 Wipe down the entire counter-top before you put objects such as mixers, coffee makers back in their places. Be sure to wipe them down as well. 90010 90009 90055 Clean the floors: 90056 Come in with your broom and clean up any debris, then use your damp mop. Back out of the kitchen as you mop to avoid footprints.90010 90019 90004 90055 Tips for Doing Your Dishes 90056 90005 90004 If you are a hand-washer, plug your sink and fill it with warm, soapy water. Let dirty dishes soak while you do other tasks. After 10 minutes or so, return to hand-wash and rinse. Place dishes in the dish-drainer to air dry or wipe them dry with a dish towel 90005 90004 When letting dishes soak, add a little baking soda to the dish water. It helps to break down stubborn food. 90005 90020 Excellent DIY Glass Cleaner 90021 90004 This makes for an excellent DIY glass cleaner.Be sure to follow the dilutions properly to avoid overly soapy results. Supplies: 90005 90008 90009 Dawn soap 90010 90009 32-oz spray bottle 90010 90009 Water 90010 90019 90020 Instructions 90021 90174 90009 Fill your bottle with roughly 20 oz of water-this is a little over half full. 90010 90009 Add 1 rounded drop (the size of a lentil) of Dawn soap to the bottle. Gently swirl or shake until slightly foamy. 90010 90009 Let the bottle sit until the suds have settled down. The bottle should have a subtle blue tinge but not look obvious.90010 90009 You can add a little more Dawn if you find that the cleaner is not working well, but less is more. 90010 90187 90004 This works great for glass and many other cleaning jobs as well! 90005 90002 Congratulations on a Job Well Done! 90003 90004 Whew! Good job, now put away your cleaning supplies and sit back and enjoy your clean house. 90005 .90000 House of containers with their own hands — photo and description of construction | With Your Hands 90001 90002 We bought the villa site back in 2009 year. 90003 90002 At first they very much wanted to build their own big country house — cozy but big. Dimensions of the future house in the dreams we gave no less than 12 on 8, moreover, the house always wanted a two-story, brusovy, so that he could withstand any frosts. 90003 90002 But dreams (it was this) was not destined to come true.90003 90002 The first problems arose when we decided to conduct a detailed analysis of the soil in order to determine what the foundation of our dream home should be. 90003 90002 It turned out that the soil on our site is a heavy loam alternating with interlayers of sand, and the groundwater is literally half a meter from the surface. 90003 90002 The conclusion was disappointing — the site can be considered swamped, and the frost punching of the soil in these places is very strong.For a timber house of this size, which we already began to build in our dreams, we would have to cast a reinforced base plate with a thickness of at least 200 mm from the concrete. 90003 90002 The price of this option for us was clearly unaffordable. 90003 90002 But most importantly — there were no guarantees that the frosty tuft did not tilt the stove with the house, after which nothing will be done — so our dream will remain, like the Leaning Tower of Pisa. 90003 90002 This conclusion made me think and consider other options, since I risked living in a house in which the windows and doors did not close due to the seasonal punching of the ground, nobody wanted.90003 90020 House from the container: plans 90021 90022 90002 The decision came with a completely unexpected side. 90003 90002 The fact is that in my basic work I often have to deal with the loading of forty-foot railway containers (the so-called «Soroca»). These containers have standard dimensions (LxWxH) — 12,0 × 2,4 × 2,7 m, own weight — 4,5 t and useful floor area — 28,8 m2. 90003 90002 It all began with a sketch, which I sketched on a simple tetrad sheet in the cage. 90003 90002 I immediately realized that standard containers can become an ideal basis for making a house of the house on such a strongly punched ground as it was on our site.90003 90002 The small own weight of the house (according to my estimates, when using two standard containers — no more than 10-12 t) and a strong metal box that will perform the functions carcass, which provides rigidity and stability of the whole structure — these are the main advantages of this design. 90003 90002 Obviously, for such a house there is generally no need to build a massive reinforced foundation, designed to resist the forces of frost heave, since any subsidence in the ground can easily be compensated by raising the corresponding part of the house to the required height.90003 90002 Looking ahead, I want to note that the further development of events has confirmed this remarkable feature of the house from the containers, however about this a bit later. And now about everything in order. 90003 90037 90002 See also: House from roof to basement — photo of construction 90003 90037 90020 House from the container by own hands — construction 90021 90022 90002 So, I refused to build a prefabricated or casting monolithic foundation. Instead, we purchased two reinforced concrete piles section 350 × 350 mm and length 6 m.90003 90002 Piles laid on a gravel pillow at a distance of 6 m from one another (with delivery and installation cost was 9 thousand rubles). After stacking the piles, I bought two forty-foot containers of 36 thousand rubles according to the announcement. 90003 90002 Together with the delivery and the order of the truck crane, this cost 85 thousand rubles. Before buying, I checked the containers for radiation background, inside it turned out to be 12 microR / h at the norm in the Irkutsk region 35 mkR / h.90003 90002 When both containers were put in place, the main work began. I did not schedule any time limits for myself, and I did not plan any stages. I just did what was necessary, one by one, as usual. 90003 90002 Although, I confess, the construction carried away and captured me completely, pushing all the other matters to the background, and the fact that the future house was acquiring more and more visible outlines every day only stimulated my excitement. 90003 90002 The first thing to do was to put a gasoline generator on the plot to weld the two containers together.90003 90002 This part of the work was done by a qualified welder, scraping the joint of two containers around the perimeter (called, in a circle). Then the Bulgarian cut-off disks for metal removed unnecessary parts of the inner walls of the containers, cut openings for windows and doors (used 0200 mm discs, did not count their consumption, but I think it took no more than 20-25 pieces ). By the time this part of the work came in June, there was unbearable heat, and inside the containers was generally like in the oven.90003 90002 Therefore, the Bulgar was picked up only early, early in the morning, or closer to evening, when the sun was already setting. In the afternoon I was engaged in erection of a skeleton of an attic and installation of rafters of a roof. 90003 90002 frame mansard collected from the beam 100 × 100 mm. 90003 90002 To the containers the beams were fastened with roofing screws 130 mm in length, and joined each other with brackets and long plumbing bolts (200-220 mm). When the frame of the attic was completely mounted, the rafters of the roof were installed.90003 90002 Each rafter has a length of 8 m, so purchased for this four-meter boards section 40 × 100 mm had to be spliced along the length. All connections were made not on nails, but on self-tapping screws. So, in my opinion, more reliable. 90003 90037 90002 See also: House of Saman with their own hands 90003 90037 90002 Over the rafters fixed a skirt of six-meter boards with the cross section 25 × 150 mm, and along the wire — galvanized steel wavy sheets. 90003 90002 A little later, when it came to finishing the house, I began to doubt: was I right that I did not put a vapor barrier film between the roof and the metal roof? 90003 90002 To somehow get out of the situation, just in case under the eaves of the roof on each side of the house installed three pieces of pipe 100 mm in length 400 mm for additional ventilation of the space under the roof.For the winter I do not close them, as we use the attic only in the summer. I have not noticed any traces of condensate formation on the metal — the ventilation is working properly. 90003 90002 But with the steel roof, I, perhaps, got excited. Rain so loudly drumming on the roof that it is all literally buzzing, a loud noise is heard throughout the house. As soon as possible, I’ll try to cover the roof with onduline or some other soft material. 90003 90002 As insulation for the skin of the house from the outside, I used piercing mats MP-50 made of mineral wool (GOST 21-880-94) with dimensions 3000x1000x60 mm.The mats were laid between vertically fixed on the walls of the containers with bars of section 60 × 60 mm, and on top are lined with a metal profiled sheet C-10, painted in ultramarine color. The bars of the vertical crate and the sheets of plating were fastened with roofing screws. 90003 90002 The interior decoration of the walls is almost no different from the exterior: the same bars of vertical crate, the same piercing mats, only on top of the heater screwed the self-tapping sheets of chipboard 2750x1200x16 mm.Between the sheets left a gap of 15 mm for further filling it with a mounting foam so that the dust does not enter the room. After the warming of the walls, I installed window blocks with double-glazed double-glazed windows. 90003 90002 The floors were also insulated with piercing mats. To do this, first fix the bars 60 × 60 mm on the metal floor, lay the insulation mats between the bars, then the flooring from the boards 150 × 40 mm, and on top of it the same sheets of chipboard. 90003 90037 90002 Reference by topic: Summer house — construction by own hands (photo) 90003 90037 90002 To install in the house a stove, in the flooring of boards and chipboard made a square cut and folded brick oven directly on the metal floor of the container.90003 90002 I do not have any fear that something will happen to her. 90003 90002 First, the metal floor of the container is designed for quite large loads. And secondly, the container is a kind of rigid box, and, as it clings, the stove will bend along with it. 90003 90002 The main thing is to ensure that these deviations are not too large and correct them in time. 90003 90002 So, a year after the completion of the basic construction works, the house was a little ass, as I expected, to the south side, where the earth warms up faster.90003 90002 As a result of the sedimentation of the soil, deviations from the vertical along the plumb line amounted to almost 6 cm. It was possible to correct this quite easily. 90003 90002 I just lifted one side of the house with an ordinary hydraulic jack, put underneath the concrete paving slab with dimensions 500 × 500 mm, and the house returned safely to its former position. 90003 90002 I did not have the electrician inside the house, but on the outer walls, in the cable channels, I think that it’s safer and looks quite neat.In addition, he equipped the kitchen in the house with a stove and a sink. 90003 90002 True, I have not yet figured out how to deal with wastewater from a sink. How to excavate and pour from the concrete a special pit to collect wastewater on such soils, I do not know, because the frost whipping will constantly «pull out» the structure from the ground. 90003 90002 Temporarily I pour water from the kitchen into the drainage ditch. I still have to decide this question. 90003 90002 To the house could be permanently live in the winter, I plan to install a heating boiler in it.In the meantime, for permanent residence, we use the house only from May to October. One time, in the winter, I lived in the house for several days at-27 ° C. 90003 90002 The house warms up at this temperature for a long time, about 4-5 hours, but then keeps the heat well. To keep the house warmer, I plan to make a paddock this year, since the house has already settled, and there is practically no more precipitation. 90003 90037 90002 See also: How to build a skeleton country house — an economical option 90003 90037 90002 That’s how I managed to make my dream come true.90003 90002 90119 House from the container 90120 It turned out to be quite normal — an economical option for the average Russian resident. The materials for its construction cost about 300-350 thousand rubles., I did not pay for the work, as I did everything myself. I think that a brigade of qualified builders can build such a house in a month, or even less. 90003 90122 90119 House of containers by own hands — photo 90120 90021 90022 90002 90119 In the photo the figures are: 90120 90003 90131 90132 Two standard forty-foot containers were delivered to the site and installed on horizontally laid concrete piles section 350 × 350 mm.90133 90132 The frame of the attic is assembled from a bar 100 × 100 mm. 90133 90132 On the outside, the first floor (containers) is insulated with piercing mats MP-50 made of mineral wool and lined with profiled sheet C-10, painted in ultramarine color. 90133 90132 To exclude the formation of condensate on the back side of the metal roof, under the overhang installed on each of the two sides of the house three ventilation pipes 100 mm. 90133 90132 On the inside, the walls are also insulated with piercing mats and lined with sheets of chipboard thickness of 16 mm.90133 90132 The brick kiln is built without a foundation and is supported directly on the metal floor of the container. 90133 90132 A year after the completion of major construction works, the southern side slipped a little. The slope was easily removed by lifting the house with a jack and laying a pair concrete paving slabs. 90133 90132 Kitchen with gas stove, sink and cupboards for dishes. 90133 90132 Container house (photo above) 90133 90150 90002 Author: V.Mospan. Photo by the author. 90003 90153 90154 TOOLS FOR MASTERS AND MASTERS, AND HOME GOODS ARE VERY CHEAP. FREE SHIPPING. THERE ARE REVIEWS. 90155 90156 90157 Below other entries on the topic «How to make your own hands — a householder!» 90158 90132 Air humidifier How to make a homemade air humidifier … 90133 90132 Hanging container for flowers by own hands: photo How to make a hanging flower container Not … 90133 90132 Wooden tub with own hands — master class (photo) How to make a wooden tub for… 90133 90132 Containers for small things in the workshop do it yourself CONTAINERS FROM CANISTER AND PR …. 90133 90132 Locker for hiding a garbage container with your own hands Masking the garbage container Not everything should … 90133 90132 Flower pot under the stone with your hands — photo Decorating the flower container under the stone … 90133 90132 Refrigerator bag with own hands How to make a refrigerator bag For making … 90037 90173 Subscribe to updates in our groups and share.90158 90173 Let’s be friends! 90158 90133.